FLTR Side SPLITSCREENS Installation
ROAD GLIDE FLTR Side SPLITSCREENS Installation Tips
Thanks for your purchase! In a perfect world where money was no object, you might have your Harley-Davidson® Tech be responsible for the installation. In the real world however, many of us are “not without skills” and elect to perform the installation ourselves (with or without the help of an appropriate and helpful Harley-Davidson® Service Manual). DISCLAIMER: Elegant Solutions Inc. dba Motorcycle Vent Screens is obliged to disclaim responsibility for any damage or injuries incurred as a result of your purchase and/or installation efforts.
(ROAD GLIDE FLTR Vent Screens Installation Tips Complete with Detailed Photographs)
ROAD GLIDE Side SPLITSCREENS Installation Tips
[NOTE: for Center SPLITSCREEN installation instructions, see the appropriate CUSTOMER SUPPORT page (Password Required).]
Among the tools required for the windshield/fairing removal/reinstallation and Side SPLITSCREENS installation are:
- TORX BITS: T-25 (wind deflectors, headlamp bezels); T-30 (@ speaker openings)
- ALLEN BITS: 1/8” (or Phillips Head screwdriver for windshield removal); 3/16” (turn signals)
The FLTR Side SPLITSCREENS installation involves removing the following (in order):
- Windshield (4 screws);
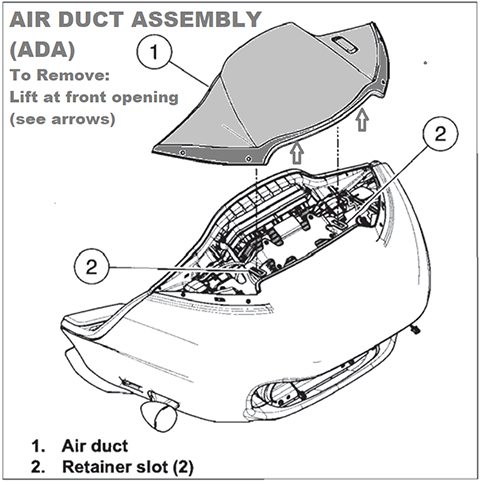
- Air Duct Assembly (ADA). Note: click HERE if ADA comes apart;
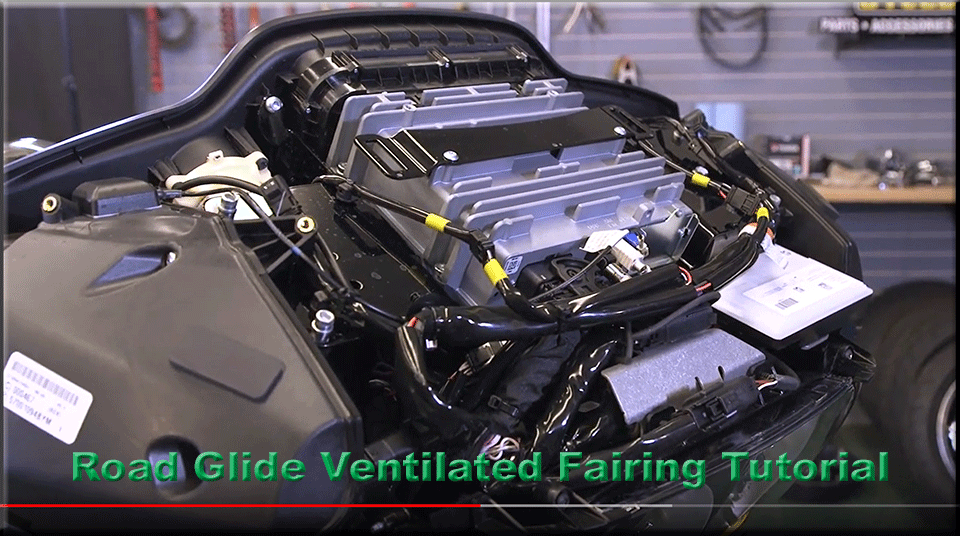
- Outer Fairing (see Tutorial Video (8:37) below);
- Headlamp Bezels (these only need to be loosened)
ROAD GLIDE FLTR Side SPLITSCREENS Installation Tips
The following Video Tutorial will suffice for those who don’t need instructions on Road Glide® Outer Fairing Removal/Reinstallation
Side SPLITSCREENS Installation Tutorial Video (3:09)
There’s no need to remove Headlamp Bezel. Simply loosen Headlamp Bezel Screws, pull Bezel out enough to slip side screen into place behind it. ? When positioning the Side SPLITSCREENS behind each curved Headlamp Bezel, if you’ll gently FLEX the screens while inserting them (rather than bending them) they’ll stay in place with spring tension while you tighten the bezel screws. SPLITSCREENS are thick enough for the bezel to clamp our screen in place as you tighten the bezel screws (no need to use the adhesives the seller of the thinner screens provides).
Need to review Outer Fairing Removal/Reinstallation? Please see the following Public YouTube Video:
Outer Fairing Removal/Reinstallation Tutorial Video (8:37)
Public YouTube Video (by J&P Cycles®) demonstrating outer fairing removal and re-installation:
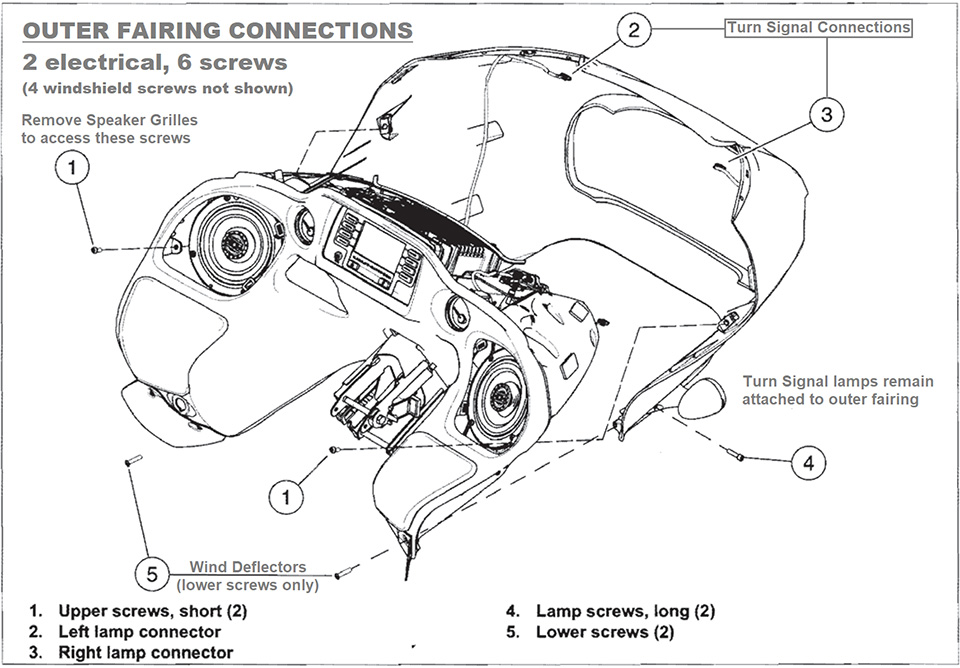
Once the fairing is off, refer to our Side SPLITSCREENS installation video. When re-installing your Road Glide windshield, be extraordinarily careful to avoid any lateral stress on the 4 windshield screws (it is quite easy to cross-thread them into the soft brass bushings).  CLICK the following link (or image) for access to 6 pages from the 2015 Harley-Davidson® Road Glide® Service Manual which focus on the outer fairing which needs to be removed to install the Side SPLITSCREENS: 2015 RG Fairing – Service Manual
A message from the President of Elegant Solutions Inc. dba Motorcycle Vent Screens: My very first “Touring Bike” was a Batwing FLHTK Ultra Limited and I loved riding it. However the Harley-Davidson® Road Glide® became my favorite touring motorcycle the first time I rode one! The “Shark Nose” frame-mounted fairing offers both high speed stability cutting through the air at touring speeds as well as low speed maneuverability with the handlebars “free” of the weight of the fairing. My BSR (back seat rider) wife is extraordinarily comfortable riding with me and considers this bike to be a “limo on 2 wheels”! Elegant Solutions Inc. dba Motorcycle Vent Screens is not affiliated with Harley-Davidson®. Terms such as: Harley-Davidson®, Road Glide® and Harley® are trademarks of the Harley-Davidson® Motor Company. They are only used here for descriptive, informational purposes and displayed either with the ® designation or in CAP’s (an alternate method of displaying the “®” designation). The 3-screen complete solution described herein is termed “Triple SPLITSCREENS”. “SPLITSCREEN(S)” and “Triple SPLITSCREENS” are terms coined by Elegant Solutions Inc.